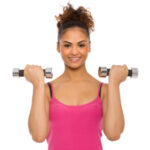
Strength training can get a bad rap, especially for people who are worried about becoming “too muscular”. They avoid strength training altogether, but what a lot of people don’t realize is how important it is because of all the benefits. Strength training can improve your metabolism (the way your body uses energy from food), reduce the risk of future osteoporosis (weak bones), and help the body release stress. Try the workouts below for your upper, middle (core), and lower body!
Helpful Tips:
- While doing these exercises, focus on your breathing (deep inhales and exhales)
- Check out the My Muscles guide as a reference for what muscles you are working.
Workout 1: Lower Body
How to: Start with the first exercise on this list. Perform the exercise 8-12 times (if you are a beginner, aim to complete 5 repetitions of the exercise). Once you finish, move on to the next exercise, until you finish all 6 exercises. Perform 2-3 sets of 8-12 repetitions with good form.
Floor Bridges
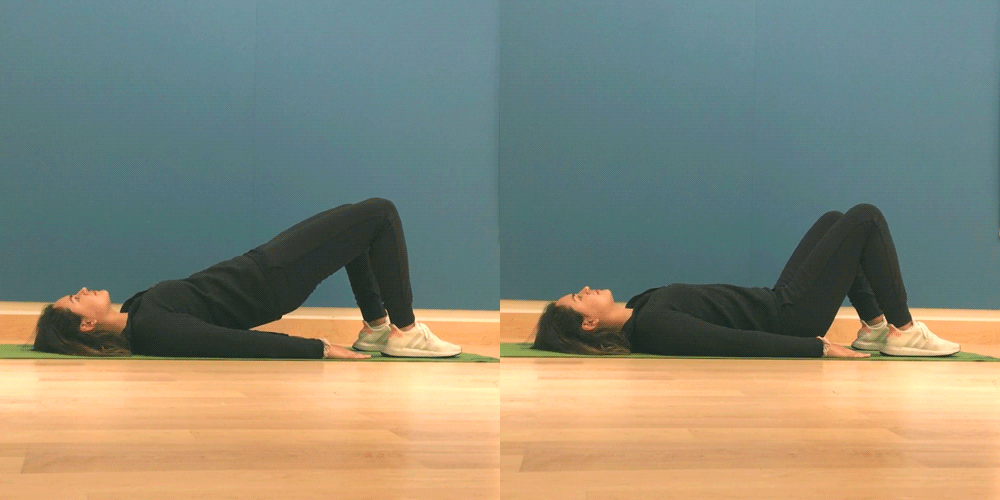 Muscles Used: gluteus maximus, gluteus medius and gluteus minimus (buttocks), hamstrings (mid rear thigh), hip adductors (inner thigh), rectus abdominis (front abdominals), erector spinae (back)
Equipment Needed: none
Instructions:
- Lie on your back and bend your knees, arms by your side with palms up.
- Keep feet flat on the floor and ankles underneath your knees.
- Draw your belly button in towards your spine (you should feel a tightness in your core).
- Lift your hips off the ground until your knees, hips, and shoulders form a straight line.
- Squeeze your gluteal muscles (you should feel this in your buttocks, not your back!).
- Hold this position for a couple seconds and then bring your hips back down to the floor.
Clam Shells
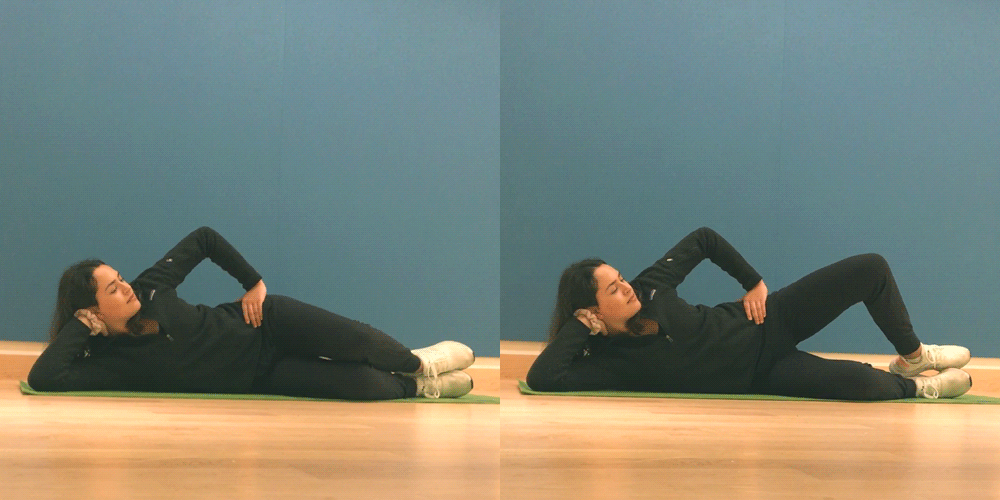 Muscles Used: gluteus medius (buttocks), adductors (inner thigh), abductors (outer thigh)
Equipment Needed: none
Instructions:
- Lie on your side with your legs stacked on top of each other.
- Bend your knees at a 45 degree angle.
- Draw your belly button in towards your spine. Keep your hips in a straight line.
- Keep your heels together as you slowly lift your top leg up.
- Squeeze your gluteal muscles (buttocks).
- Slowly lower the top leg.
- Repeat on the other side.
Squats
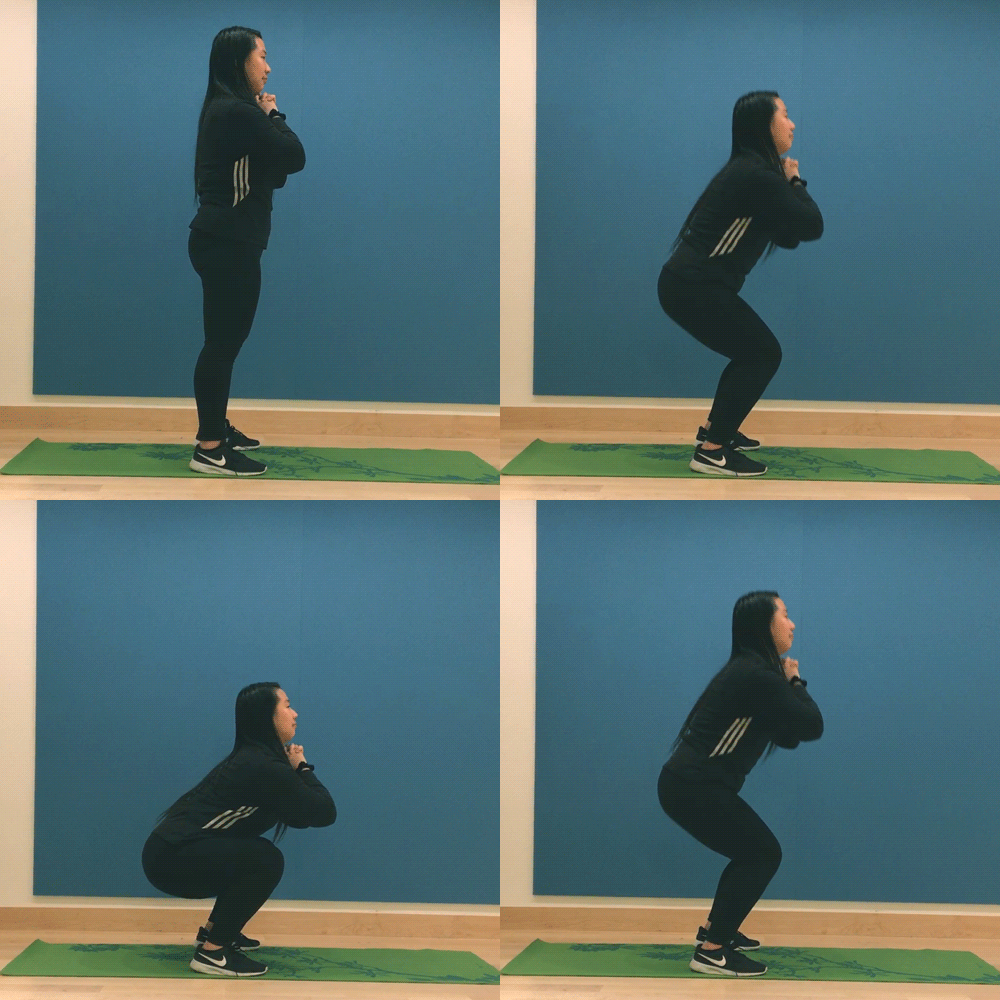 Muscles Used: gluteus maximus (buttocks), hamstrings (mid rear thigh), quadriceps (front thigh), erector spinae (back)
Equipment needed: none
For a more advanced exercise: you can hold a dumbbell or weighted object with both hands. Hold weight close to your chest as you perform the exercise.
Instructions:
- Stand with feet hip width distance apart, toes facing forward.
- Bend your knees and push your hips back and down as if you were sitting in a chair.
- Keep your chest up and look forward.
- As you are squatting, keep your knees behind your toes (if you look down, you should be able to see your toes).
- As you stand back up, press your heels into the ground.
- Squeeze your gluteal muscles (your buttocks) at the top.
Reverse Lunges
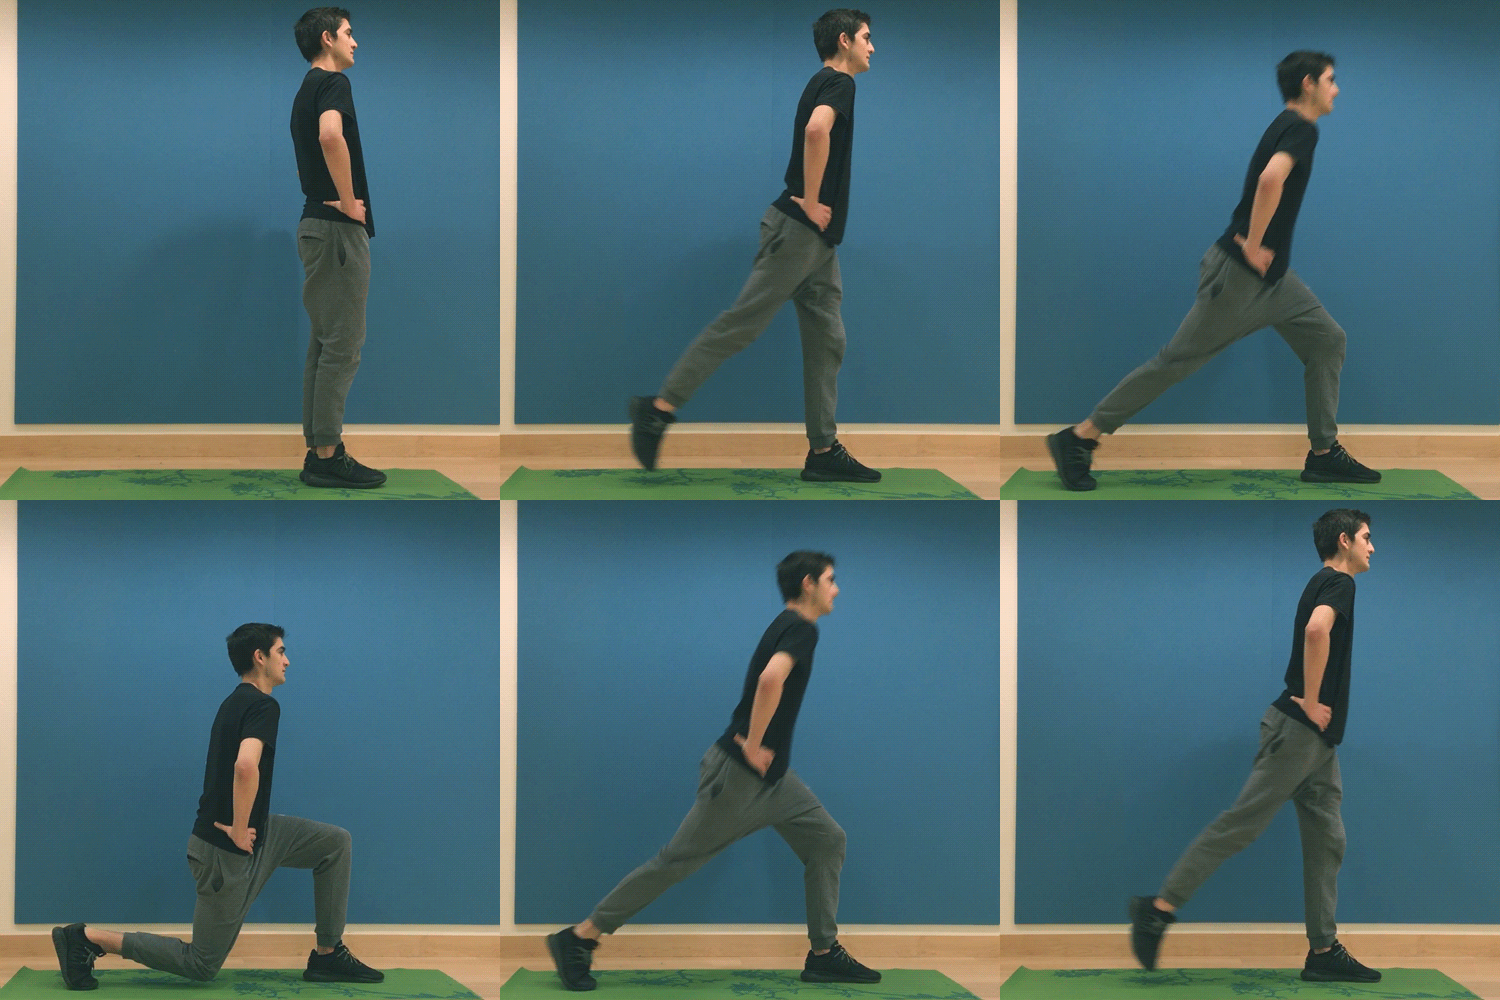
Muscles Used: gluteus maximus (buttocks), hamstrings (mid rear thigh), quadriceps (front thigh)Equipment Needed: noneInstructions:
- Stand with feet hip width distance apart, toes facing forward. Keep your chest tall, shoulders down.
- Step one leg back behind you, dropping that back knee down towards the ground and bending your front knee so your thigh is parallel to the floor
- On the back leg, the front of your foot is the only part of your foot touching the floor
- On the front leg, press your heel into the ground, as if you were squishing a bug. Keep your front knee in line with your ankle.
- As you stand up, press into your front heel, and bring your back leg forward to your starting position.
- Make sure to squeeze your gluteal muscles (buttocks) as you stand up.
- Repeat with the other leg.
Side Lunges
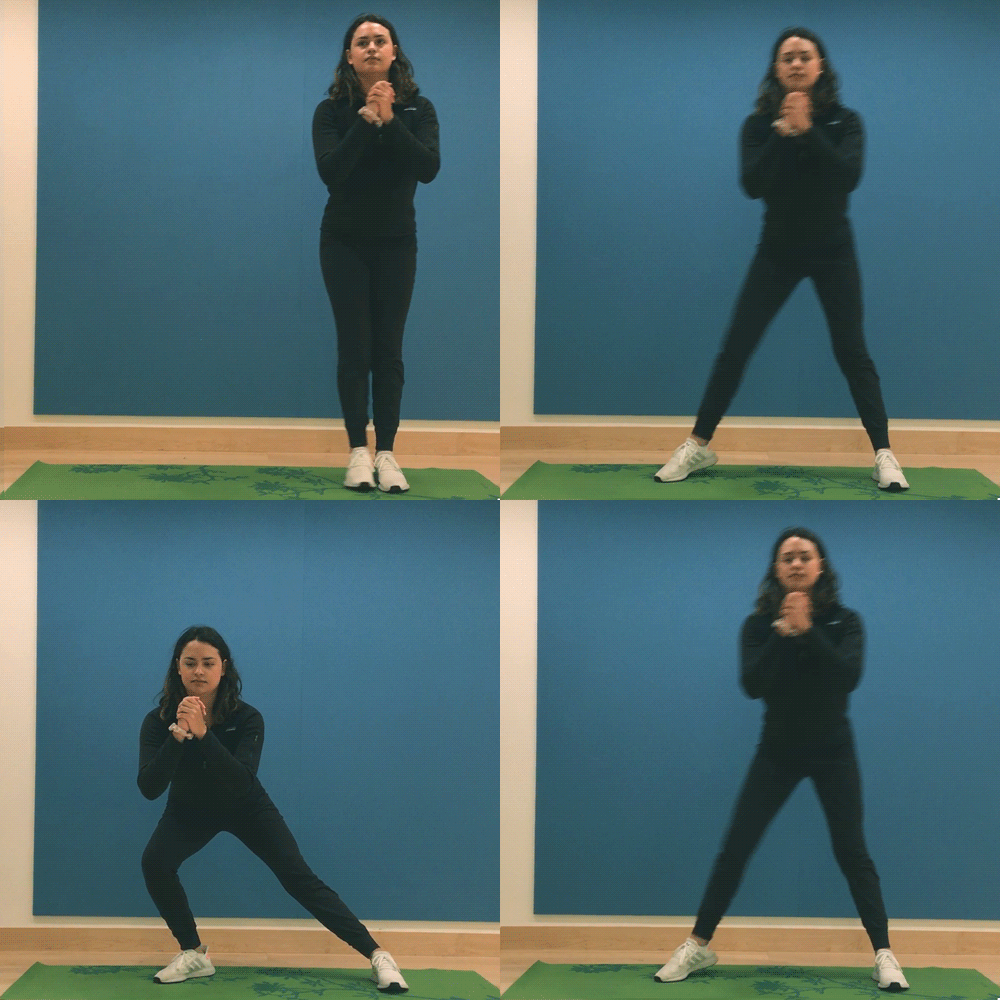
Muscles Used: gluteus maximus (buttocks), hamstrings (mid rear thigh), quadriceps (front thigh), abductors (outer thigh), adductors (inner thigh)Equipment Needed: noneFor a more advanced exercise: you can hold a dumbbell or weight objected with both hands close to your chest or hold two weights by your sideInstructions:
- Stand with feet shoulder width apart, toes facing forward.
- Take a big step to the right, keeping your left leg straight and left foot flat on the floor
- Keep your head and chest up and draw your abdominals in towards your spine
- Lower your body by pushing your hips back as if sitting in a chair and bending your right knee.
- Hold at the bottom for a few seconds, then push through the right heel as you come back to standing position.
- Repeat with the left leg.
Standing Calf Raises
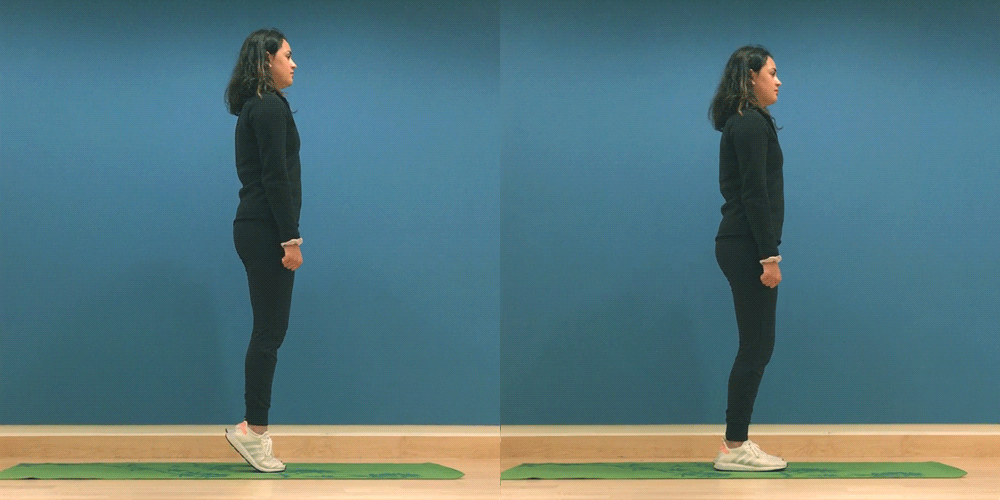 Muscles Used: gastrocnemius (upper calf), soleus (lower calf)
Equipment Needed: none
For a more advanced exercise: Hold two dumbbells or weighted objects by your side or on up on your shoulders.
Instructions:
- Stand tall, feet flat on the floor, shoulder width distance apart
- Raise your heels slowly off the ground until they are a couple inches off the floor.
- Keep your leg straight. There should be no bending in the knee.
- Hold for a couple seconds at the top
- Slowly lower heels back to the floor
Workout 2: Upper Body
How to: Start with the first exercise on this list. Perform the exercise 8-12 times (if you are a beginner, aim to complete 5 repetitions of the exercise). Once you finish, move on to the next exercise, until you finish all 6 exercises. Perform 2-3 sets of 8-12 repetitions with good form.
Push-ups
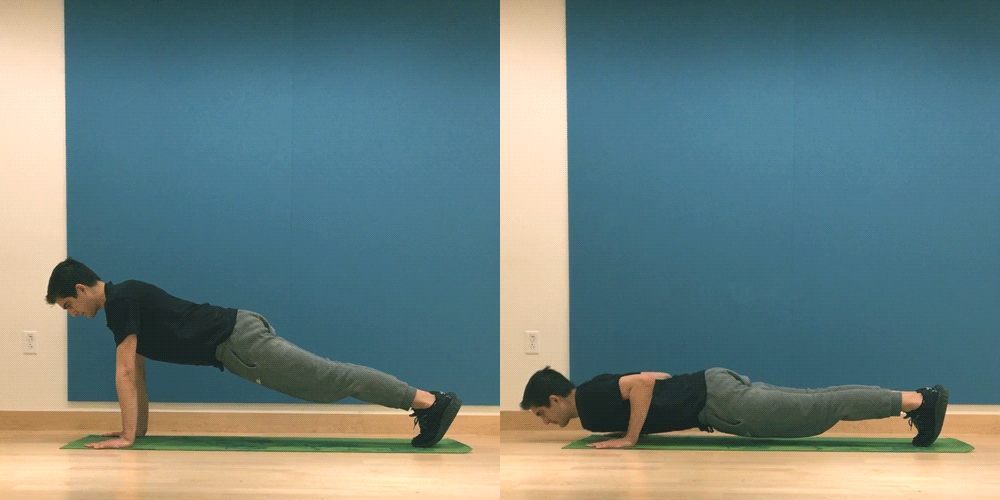
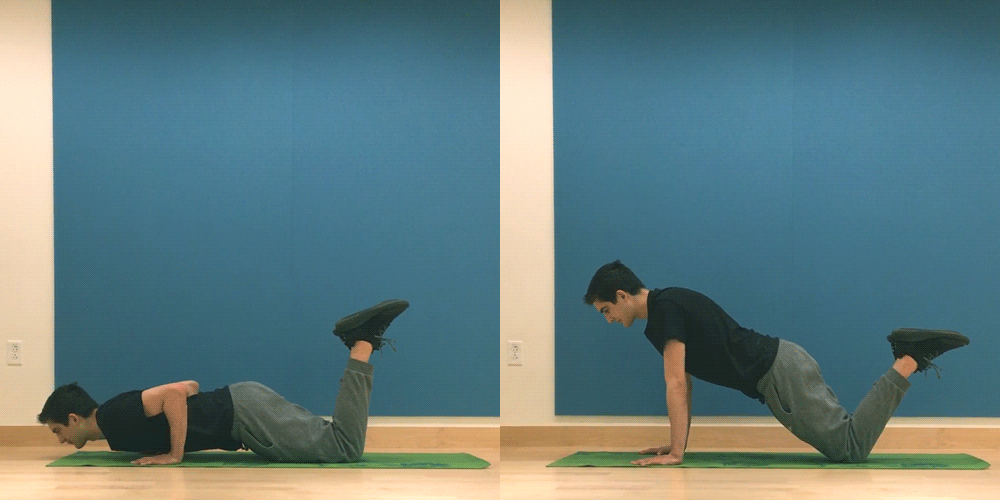
Muscles Used: latissimus dorsi (mid back), pectoralis major (chest), deltoids (shoulders), triceps (back upper arm), biceps (front upper arm), and rectus abdominis (front abdominals)
Equipment Needed: none
For beginners: Start in a kneeling position with feet together behind you. Keep knees and feet on the ground the entire time during the exercise.
For a more advanced exercise: Lift knees off the ground so your body is in one straight line, as if you were in a plank position.
Instructions:
- Start kneeling on the floor, feet together behind you.
- Place palms on the floor, arms extended. Shift your upper body forward so that your shoulders are directly over your hands.
- Fingers face forward or are slightly turned inward.
- Keep your knees on the floor or lift them up so your body is in a straight line (plank position).
- Draw your belly button in towards your spine and squeeze your buttocks. This will keep you stabilized.
- Lower your chest to the floor and bend at the elbows. Lower until your face is about 2-3 inches from the floor.
- Push your body weight back up to starting position, by extending arms from a bent elbow to straight elbow.
Up and Down Plank
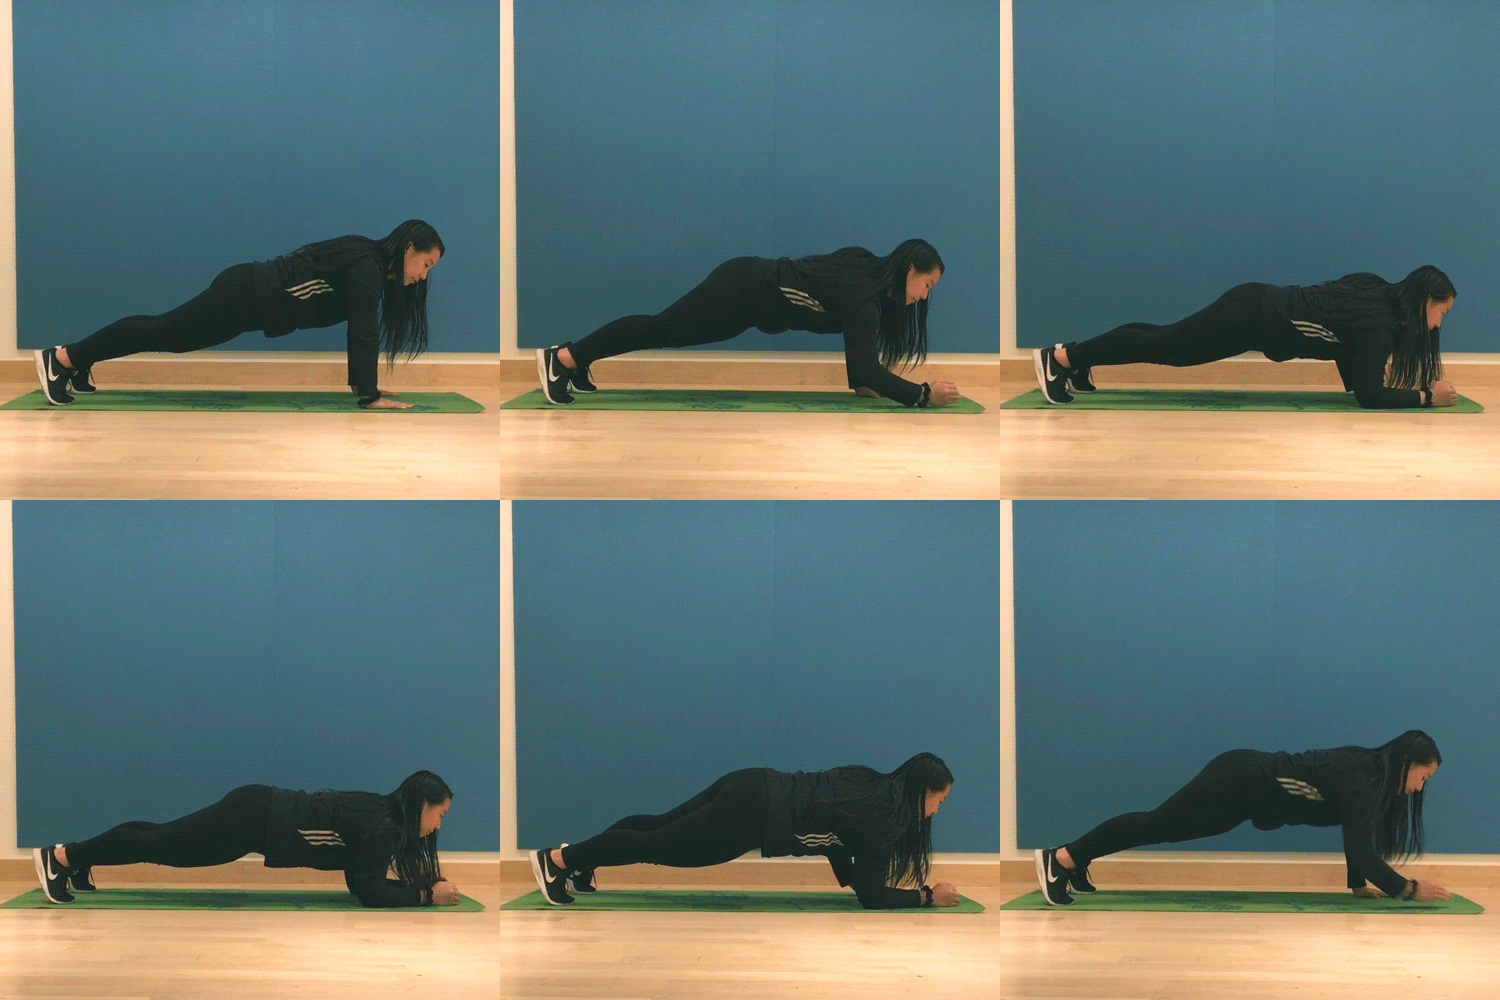
Muscles Used: rectus abdominis (front abdominals), internal and external obliques (waist or side), triceps (back upper arm), biceps (front upper arm)
Equipment Needed: none
Instructions:
- Lie face down, and raise body into a push up position, hands underneath your shoulder. Draw your belly button in towards your spine (this is the high plank “up” position)
- Bend your right arm, resting your elbow beneath your shoulder, where your hand was.
- Do the same with the left arm (you are now in the low plank “down” position)
- Straighten your right arm, placing your palm where your elbow was.
- Do the same with the left arm
- Try for 4-5 repetitions, working your way up to 8-12.
Bicep Curls
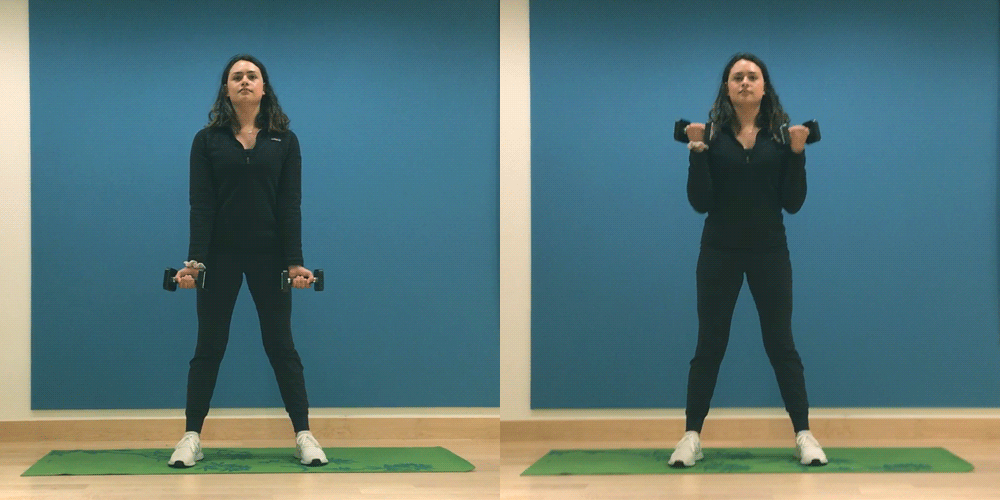 Muscles Used: biceps (front upper arm), and deltoids (shoulders)
Equipment Needed: 1 Weighted object (dumbbells, kettlebells, unopened soup cans, 12-20 oz water bottles)
For a more advanced exercise: Increase weight by 3-5 pounds (1.5-2.5 kg) when you are able to complete 8-12 reps comfortably.
Instructions:
- Stand up straight, with knees slightly bent, feet hip distance apart and pointing forward
- Keep shoulders even as you complete this exercise.
- Hold weights in both hands, palms facing upward, with elbows positioned next to waist and rib cage. Position arms so weights are directly above thighs and elbows are slightly bent (starting position).
- Slowly and evenly lift both forearms upright to shoulders into a full bicep curl (ending position).
- Evenly and slowly lower both arms down to starting position. Remember to squeeze your bicep muscles as you lower, instead of letting gravity do the work.
Triceps extensions
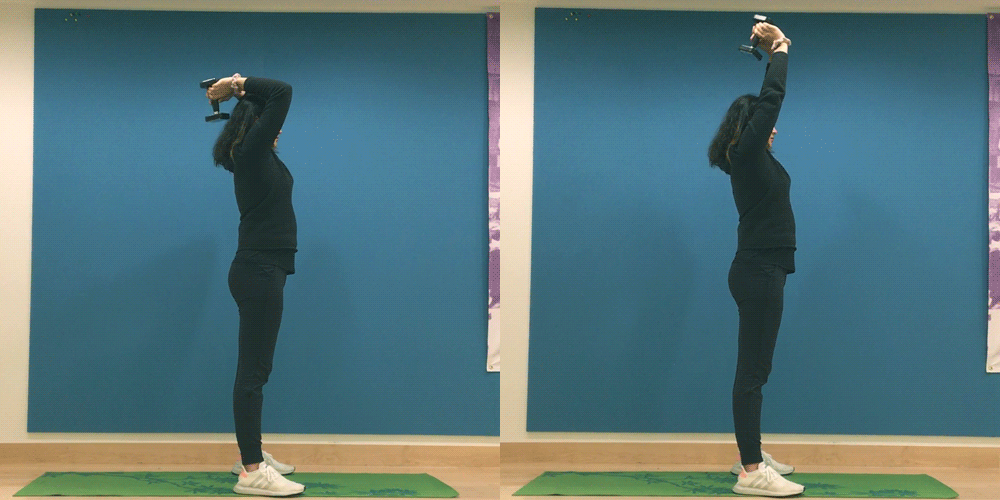 Muscles Used: triceps (back upper arm) and latissimus dorsi (mid back)
Equipment Needed: 1 Weighted object (dumbbells, kettlebells, unopened soup cans, 12-20 oz water bottles)
For a more advanced exercise: Increase weight by 3-5 pounds (1.5-2.5 kg) when you are able to complete 8-12 reps comfortably.
Instructions:
- Stand up straight, with knees slightly bent, feet hip distance apart and toes pointing forward.
- Keep shoulders even as you complete this exercise.
- Hold weight above head in both hands, arms extended. Bend your arms at your elbow, lowering the weight behind the head towards the ground.
- Evenly and slowly bring your forearms back to starting position. Remember to squeeze your triceps muscle, instead of letting gravity do the work.
Chest Press
 Muscles Used: pectoralis major (chest), triceps (back upper arm), biceps (front upper arms), and deltoids (shoulder)
Equipment Needed:
2 Weighted objects (dumbbells, kettlebells, unopened soup cans, 12-20 oz water bottles). If you only have 1 weighted object, you can alternate your arms during the exercise.
For a more advanced exercise: Increase weight by 3-5 pounds (1.5-2.5 kg) when you are able to complete 8-12 reps comfortably.
Instructions:
- Stand up straight, with knees slightly bent, feet hip distance apart and toes pointing forward
- Hold weights and bring elbows up to shoulder height. Palms should face forward and elbows bent to form a 90-degree angle (starting position).
- Evenly and slowly move arms together. Keep elbows bent at a 90-degree angle until elbows and forearms meet in front of your face and chest. Now palms are facing each other.
- Move both arms back to starting position.
Overhead Press
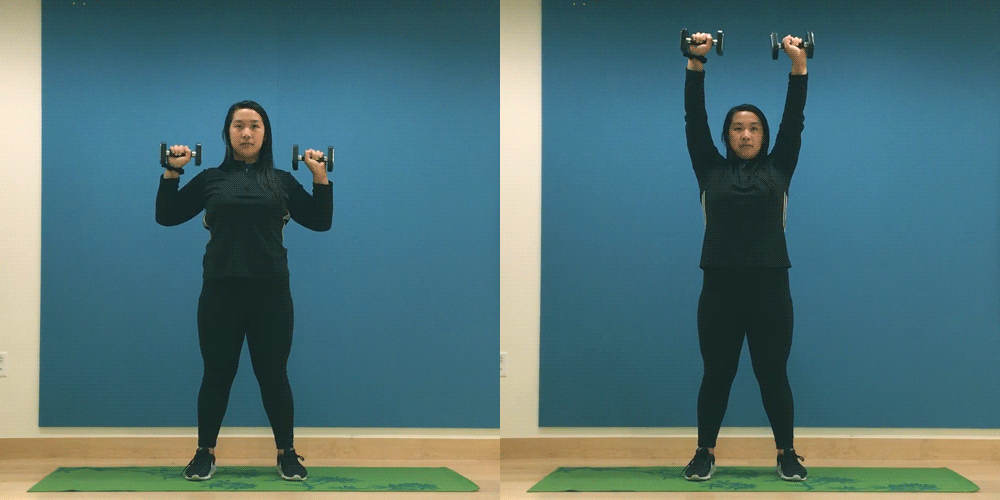 Muscles Used: deltoids (shoulder), pectoralis major (chest), and triceps (front upper arm)
Equipment Needed: 2 Weighted objects (dumbbells, kettlebells, unopened soup cans, 12-20 oz water bottles). If you only have 1 weighted object, you can alternate your arms during the exercise.
For a more advanced exercise: Increase weight by 3-5 pounds (1.5-2.5 kg) when you are able to complete 8-12 reps comfortably.
Instructions:
- Stand up straight, with knees slightly bent, feet hip distance apart and toes pointing forward.
- Keep shoulders even as you complete this exercise.
- Hold weights at shoulder height with palms facing forward (starting position).
- Slowly and evenly press weights up above your head until your arms are in a full extension. Your biceps should be right next to your ears.
- Evenly and slowly lower both arms down to starting position.
Workout 3: Core (Middle body)
How to: Start with the first exercise on this list. Perform the exercise 10-15 times OR hold the position for 20-30 seconds. Once you finish, move on to the next exercise, until you finish all 6 exercises. Perform 2-3 sets of 8-12 repetitions with good form.
Plank
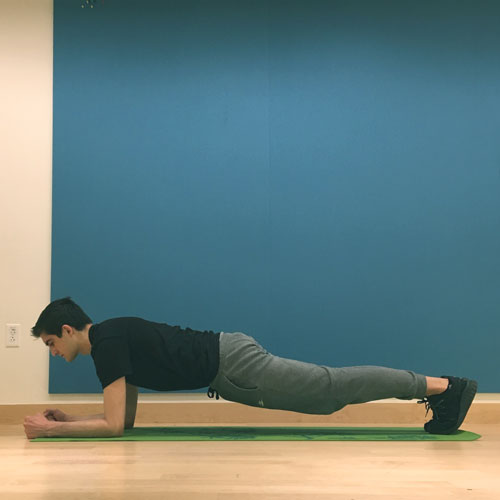
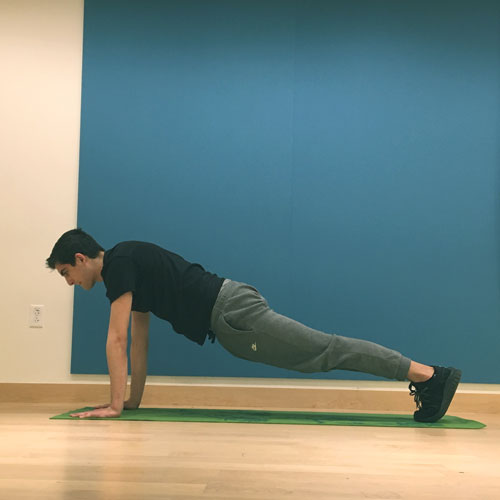
Muscles Used: rectus abdominis (front abdominals), internal and external obliques (waist or side), gluteal muscles (buttocks))
Equipment Needed: None
Instructions:
- Plant your hands directly under shoulders, legs extended behind you, as if you were about to do a push-up
- Press your toes into the ground and squeeze your gluteal muscles (buttocks) to stabilize you
- Draw your belly button in towards your spine
- Continue to breathe (inhale and exhale).
- Look at a spot on the floor a little further out from your hands. Keep your head in a neutral position: avoid looking up at the ceiling OR putting your chin to your chest
- Hold for 20 seconds, slowly work up towards a longer holding time.
For beginners: Instead of extending legs straight behind you, rest your knees and lower leg on the floor. Keep your abdominals engaged and hands planted firmly on the floor underneath your shoulders.
For more advanced: Hold the plank position on your forearms.
Once you feel comfortable holding a plank position for 20-30 seconds, slowly work up towards a longer holding time.
Supermans
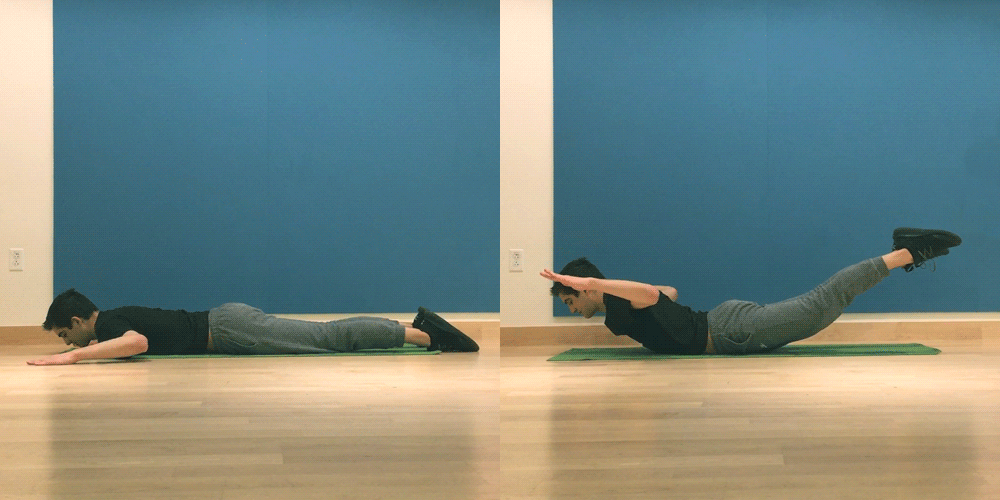
Muscles Used: latissimus dorsi (mid back), erector spinae (back), gluteal muscles (buttocks), hamstrings (mid rear thigh), rectus abdominis (front abdominals)
Equipment Needed: None
Instructions:
- Lay with your stomach on the ground. Draw your belly button in towards your spine to engage your abs.
- Extend your arms in front on you, palms facing down
- Lift your head, chest, and arms off the ground as far as possible
- At the same time, bend your legs and lift your thighs off the ground. (the goal is to create a U shape with your back)
- Hold this position for 1-2 seconds, then slowly lower back to the floor
For beginners: If it feels too difficult to lift both your arms and legs at the same time, you can alternate with 1 arm and 1 leg (for example: lift left leg and right arm, and vice versa)
For more advanced: Work up to holding this position for 5-10 seconds , without sacrificing your form.
Right/Left Plank
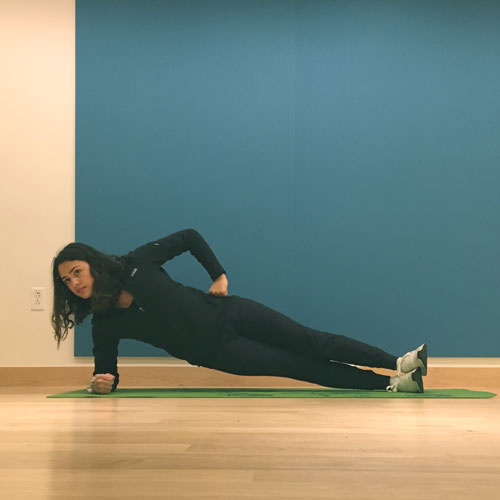
Muscles Used: deltoids (shoulder), pectoralis major (chest), and triceps (front upper arm)
Equipment Needed: 2 Weighted objects (dumbbells, kettlebells, unopened soup cans, 12-20 oz water bottles). If you only have 1 weighted object, you can alternate your arms during the exercise.
For a more advanced exercise: Increase weight by 3-5 pounds (1.5-2.5 kg) when you are able to complete 8-12 reps comfortably.
Instructions:
- Lay on your side with your forearm flat on the floor. Make sure your elbow is right under your shoulder.
- Extend your legs out in a long line. Stagger your feet for more support, or stack your feet on top of one another for more of a challenge
- Draw your belly button in towards your spine and lift your hips off the floor so that you are in one long, straight line.
- You can keep your free hand on your hips to help you balance.
- Hold this position for 20-30 seconds. Continue to breathe.
- Repeat on the other side.
For beginners: Start with both knees bent on the floor, so that you form a straight line from your head to your knees. Lift your hips up and draw your abdominals in to engage your core.
For a more advanced exercise: Instead of holding this position on your forearm, keep your hand firmly planted on the floor, underneath your shoulder.
Bicycle Crunches
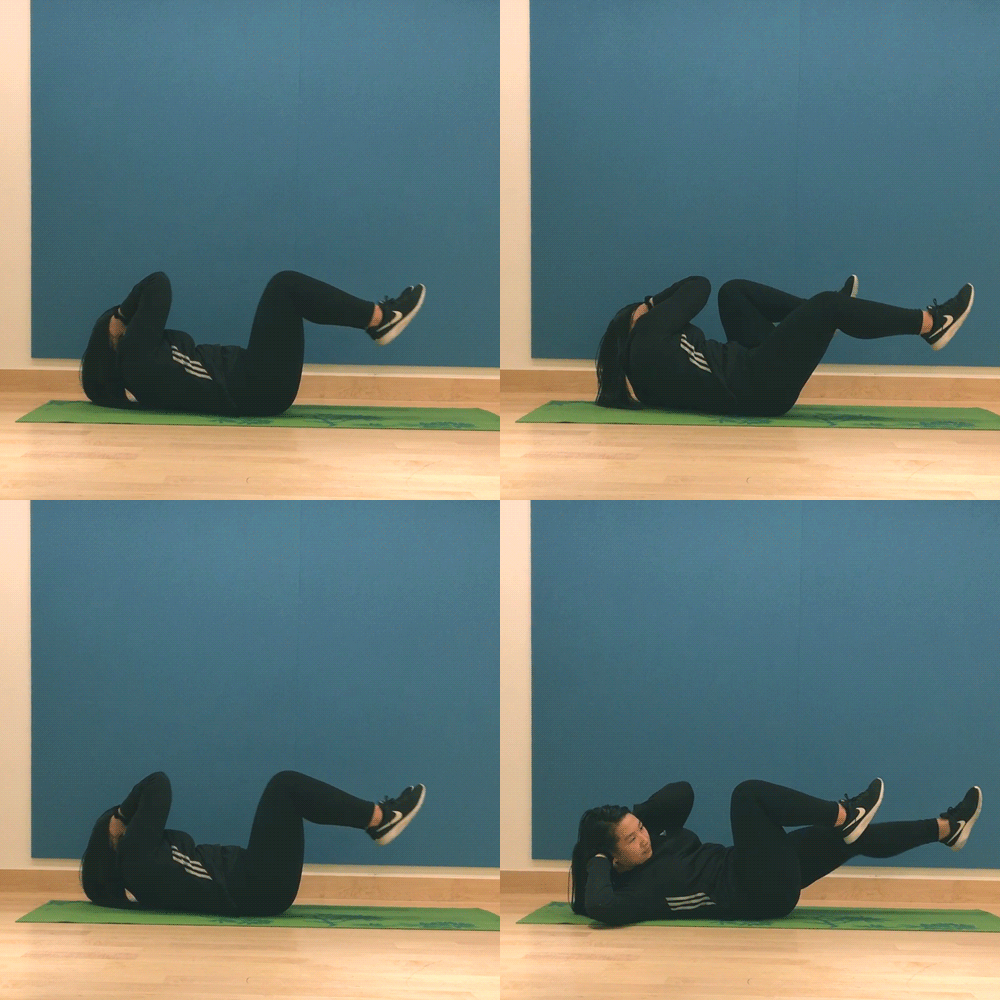
Muscles Used: rectus abdominis (abdominals), internal and external obliques (waist or side)Equipment Needed: noneInstructions:
- Lie flat on the floor with your lower back pressed into the ground
- Draw your belly button in towards your spine
- Place your hands behind your head and bend your knees towards your chest
- Lift your head and shoulder blades off the ground
- Straighten your right leg out and twist your left elbow towards your right knee. Make sure as you twist your core is moving, not just your elbows.
- Return to starting position.
- Repeat on the other side (Twist your right elbow towards your left knee)
V-Sit
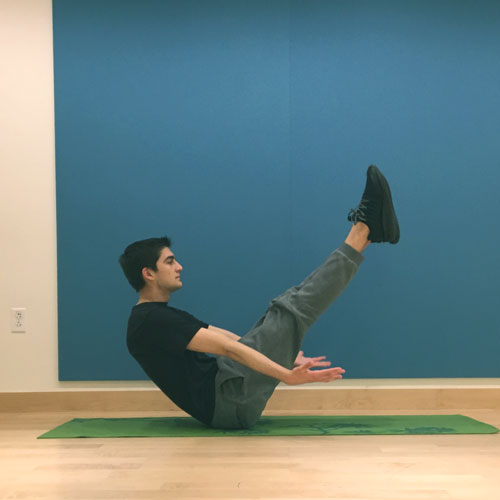
Muscles used: rectus abdominis (front abdominals), internal and external obliques (waist or side)
Equipment needed: none
Instructions:
- Start seated on the floor, legs extended out in front of you and hands on the floor slightly behind your hips (fingers facing towards your feet)
- Draw your belly button in towards your spine to engage your abs
- Lean back slightly as you raise your legs up to a 45 degree angle. For beginners: keep knees bent as you raise them up. For more advanced: keep legs straight.
- Roll your shoulders down away from your ears.
- Keep your head up and try to keep your spine in one long straight line.
- Hold position for 20-30 seconds.
For beginners: Start with your forearms on the floor slightly behind you to support your core and help you balance. Slowly work up to having only your palms on the floor for support
For more advanced: Reach your arms forward towards your shins as you hold this position. You can also challenge yourself by holding this position for longer than 30 seconds.
Leg raises
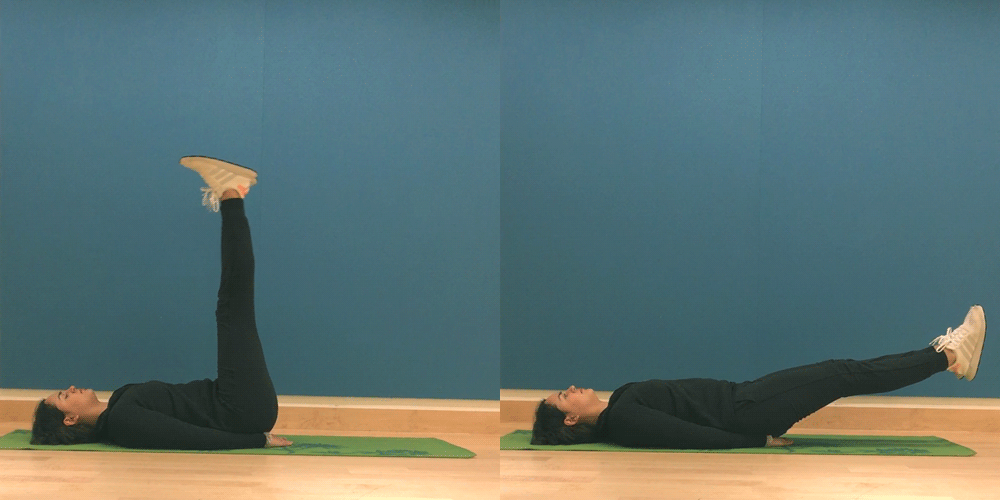
Muscles Used: rectus abdominis (front abdominals)
Muscles Used: none
Instructions:
- Lie on your back with legs extended out in front of you
- Place your hands under your buttocks if you need more support, otherwise have your arms by your sides. The goal is to keep your lower back on the ground.
- Draw your belly button in towards your spine
- Slowly lift your legs up until your legs are in one straight line with your hips, using your lower abdominal muscles to do this motion (try to avoid swinging your legs up in the air).
- Slowly lower your legs back down until they are just above the floor.
- Keep your head and back on the ground the whole time. Avoid lifting your head up as this may strain your neck.
For a more advanced exercise: As you raise your legs off the ground, keep your core engage and continue lifting your legs towards the ceiling until your butt comes slightly off the floor. Then, slowly lower legs down.
Our health guides are developed through a systematic, rigorous process to ensure accuracy, reliability, and trustworthiness. Written and reviewed by experienced healthcare clinicians from Boston Children's Hospital, a Harvard Medical School teaching hospital and consistently ranked as a top hospital by Newsweek and U.S. News & World Report, these guides combine clinical expertise, specialized knowledge, and evidence-based medicine. We also incorporate research and best practices from authoritative sources such as the CDC, NIH, PubMed, top medical journals, and UpToDate.com. Clinical specialists and subject matter experts review and edit each guide, reinforcing our commitment to high-quality, factual, scientifically accurate health information for young people.
